Music video recorded in studio
Explanation of steps and techniques
Article introduction:
This article was initially created in 2016 when we were still using Davinci Resolve 12. Now we are in Resolve version 18 and some of the steps here we no longer perform or perform differently.
Apart from these technical differences, the value of the article remains. The activities and reasoning behind it remain relevant.
This article explains the post-production steps we took to produce a video for the very talented pianist, Elga Zhara.
The post-production activities are really defined when we plan the video we want to create. The purpose of the video, main messages, emotions, and the script will define not only what and how we film but also the post-production activities.
Elga is a classically trained piano player and has recently decided to learn popular tunes and perform professionally.
This video has the main objective to show Elga’s skills and some of the repertoire that she wants to perform professionally.
Instead of showing many long songs and producing a long video, we decided to have only a few bars of each song.
Elga and Daniel selected the songs that would appeal to a large number of potential clients and created a mix that is pleasant to hear and at the same time demonstrates piano skills and a sophisticated repertoire.
On the filming day, we execute the shooting plan/schedule and have all the footage we need for the plan.
We always film more than we need to reduce risks and create quality alternatives.
The amount of extra footage is defined by the type of video and experience.
Let’s jump to this case study and see how we did it.
Watch the video.
Equipment used:
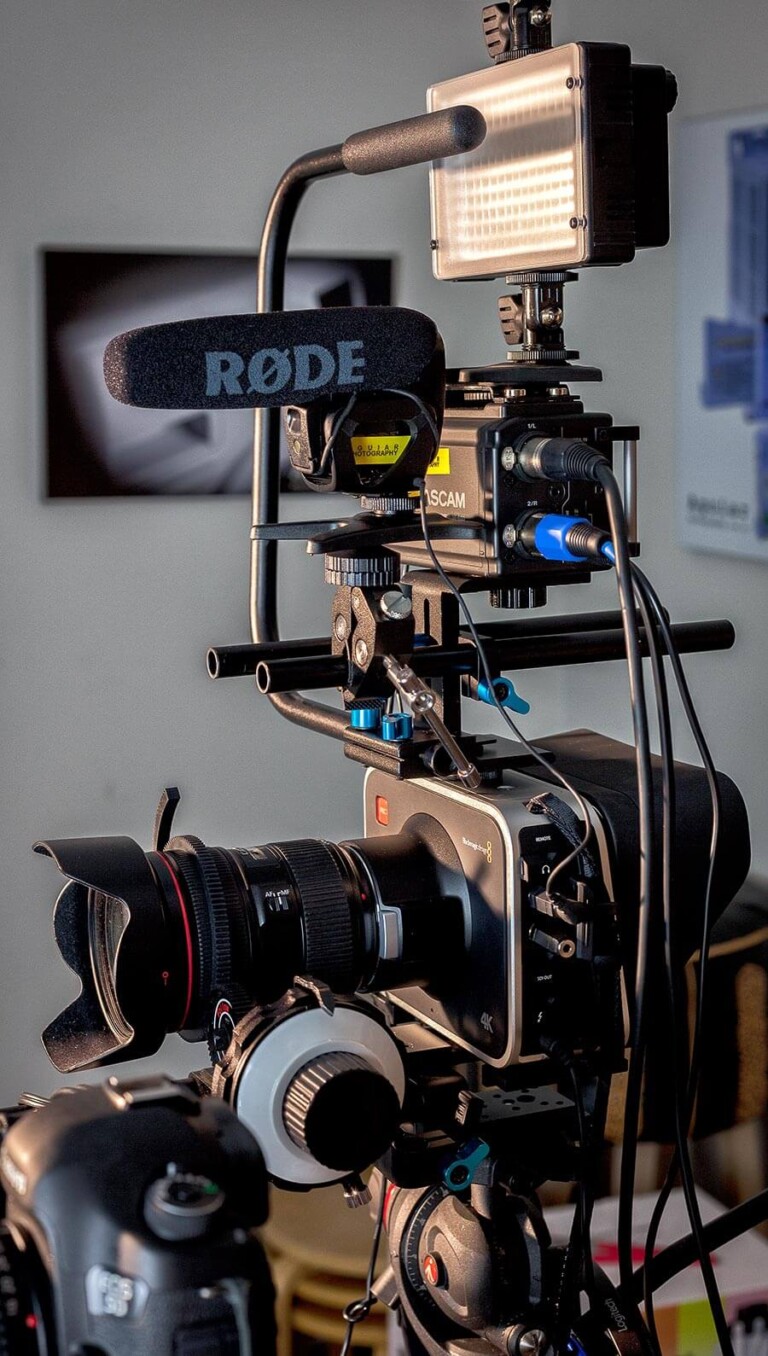
As you probably noticed, we used a few cameras in this video. We used one 4K Black Magic Production camera (4K raw 35mm) to capture Elga’s side showing part of her body and most of the piano keys, a Canon 5D MK3 camera close-up on her face, a Canon 5DS close-up on the hand’s activity on a 90-degree angle and a Canon 5D MK2 over the top of the keyboard. We also used a GoPro 3 black on some close-ups and difficult angles.
The audio was captured by a 4-channel recorder where two channels were inputs from the keyboard and two from external studio microphones. The external microphones on the cameras capture “reference” audio that will be used only to “sync” each video with the other videos from other cameras.
This is a behind-the-scenes video showing part of the recording session.
Footage inspection before we finish the filming day.
We inspected the videos and audio cards. We checked that we had sufficient good-quality material to work with.
During the recording, we stopped and restarted several times to mark the parts that we wanted to use and to separate one song from the next. We check cards from all cameras and several files from each camera.
At this point, we start to have our favorite songs. It was also a good time to check with Elga which parts she liked best.
Post-processing hardware required:
Video and audio editing is a very intense activity for the computer and you will need one with very fast disks, lots of memory, and a super-fast video card or multiple cards (as in our case). These video cards also need to have lots of fast memory if you want to have real-time 4K raw editing.
We also used two large colour calibrated monitors (wide gamma of colours), good speakers and a good coffee machine. I cannot work without coffee. ?
Grouping the footage and keeping it all organized:
This is a very important task and one that takes a long time.
We back up all footage to an external disk and place a copy of all files into the fastest disk on our fastest server.
The first part is to separate the footage into categories and rename the files as required. Rename the files with the song name and camera. Example: Song1_Camera2 or Song1_Closeup.
I like to create directories for each camera as you can see here:
Audio editing, enhancements, and mastering:
Audio quality is important on all video projects and music videos require special care. We need more polished audio editing that may include pitch corrections, reverberations, and precision frequency adjustments in addition to noise reduction, level, and brightness adjustments.
I used Adobe Audition to cut, mix, fix, and master each track for this video. Currently, I execute some of these tasks using the fantastic Davinci Resolve 18.
The first step is the selection of each file that has the same music. I mean the same take on the same music.
As you can see from the files on the previous image the music “Beauty and the Beast” (take 1) was recorded by 3 devices. The “BeautyAndBeast 1” is from the main recorder that was captured from an audio feed from the keyboard, the “1B” is from one of the studio microphones, and the “1C” is from the second microphone.
I cut the parts that are not necessary for each audio file.
I clean any noise (clicks or bangs) and reduce background noise.
Then I adjust volume levels and add reverberation, brightness, and tone adjustments.
These activities are quite challenging when multiple instruments and voices are used together.
Adobe Audition CC is a great tool to visually inspect frequencies and amplitudes. It has filters that sample and remove background noise.
The following is a screen showing one of the audio files in Audition CC.
In some projects, we mix multiple audio files and create a multi-track audio file.
For this production, we decided to use only the audio feed from the keyboard.
We separated the stereo audio file into two mono files and re-mixed them back together. This allows us to create channel separation and apply corrections and enhancements in each track separately.
See this multi-track audio mix screen.
Video and audio sync and original audio track replacement:
We have many video and audio files that need to be in sync. That means that every video file of the same scene is at the same point in time with one camera in each track.
The audio files also need to be in sync with each other and in sync with all video files.
When this is done, we can mute the bad (reference) tracks and leave only the best audio tracks.
Not all projects need to have all the files in sync.
If all clips are of only one song (not the case in this project), having all footage in sync at the beginning of the editing process is an advantage. It gives you an overall view of all files and where they can be used.
In this project we use a great tool named Plural Eyes that integrates very well with Adobe Premiere CC but not so well with DaVinci Resolve studio 12.
This is what the Plural Eyes screen looks like. You can see multiple cameras and audio files and how they were positioned one over the other by this amazing tool.
The task of video and audio syncing is still required today but most of it can now be done directly in Davinci Resolve 15. In my last 5 projects, I did not use Plural Eyes.
Currently we can do the same all inside Davince Resolve 18.
First-cut with DaVinci Resolve Studio 12:
Up to last year, I used Adobe products for all my main video editing tasks.
The NLE (Non-Linear Editing) program was Adobe Premiere CC and was complemented by Adobe After Effects CC.
For the colour grading, I used Adobe Speed Grade which integrates well with Premiere and was somehow good to use.
With the new Black Magic DaVinci Resolve Studio 12, I now only rarely use Adobe products for videos.
I used Resolve Studio 12 for most of the tasks in this project except for the creation of the first timeline. I used Adobe Premiere for the first timeline (first cut).
The first thing required in Resolve is to bring the media into the software and get it organized in “bins” (folders).
For this project, I used the XML (information file) that was generated by the Plural Eyes 3 and exported back to Adobe Premiere.
After importing back the timeline, I exported the timeline via an XML generated by Premiere into Davinci Resolve 12.
This last task was required because Resolve 12 does not interface with Plural Eyes well.
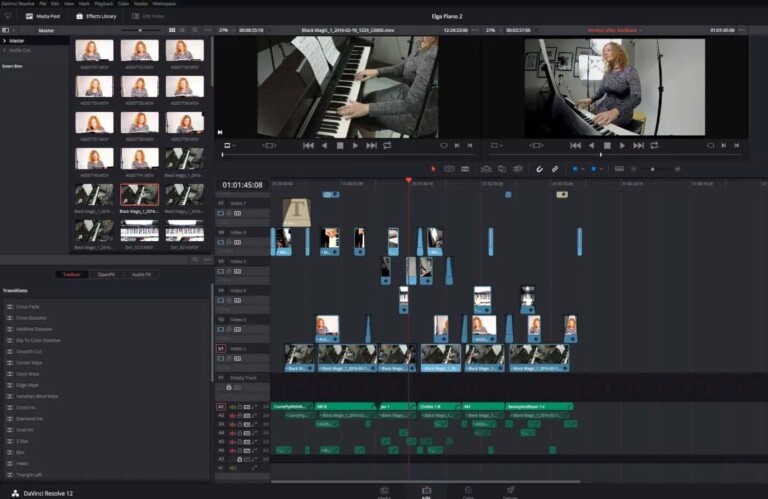
With the timeline with all footage synced in Resolve, I started editing, cutting, and moving things around.
I trim tracks, move them around and add transitions and effects as part of the basic cut phase.
This is a screen of the timeline with the video and audio tracks in Resolve 12.
I am currently editing almost exclusively using Davinci Resolve 18.
Colour grading:
With the basic cut done, it is time for improving the scenes. This phase is called “colour grading” and whoever does this is called a “colourist”.
During the colour grading phase, the video is enhanced, corrected and aesthetically changed.
It is also when artistic changes are applied to induce emotions or to help in telling the story.
I perform the colour grading in at least two main steps.
For the first one I adjust the video to have a “neutral” colour balance (greys are greys, not yellow, green, etc.). Adjust the highlights and blacks to the level of contrast I want that looks natural. I also bring the skin tones somewhere close to what they look natural.
At this point, I am not trying to add any “artistic” look yet. I am just setting a starting point for all other adjustments. The software allows me to save a still image from the video and use it to compare one scene with another.
I still call basic grading all global and local corrections, even if they require tracking (when the adjustments move based on the scene) that have the objective to get to a baseline of a natural-looking video.
I call second grading all adjustments done over the basic grading that have more artistic intent. It can be a conversion to black-and-white, desaturation, high contrast, strong vignette, etc.
In this image you see scopes. I use them to analyse the amount of each colour and luminosity in each scene. The Vector scope (bottom left) shows the saturation of colours. It is also very handy to adjust skin tones.
Create a uniform look among multiple cameras and scenes.
The idea is to have a video where you do not notice that we used different camera models and changes in lighting. A harmonious look among all scenes and cameras.
I adjust all scenes from all cameras to the same levels (greys, highlights, blacks, and skin tone) using the scopes, the color-calibrated monitors, and the stills captured.
On this screen, I was comparing scenes from multiple cameras. My main interest was to have a similar skin tone, similar dark black and bright whites from one scene to the next.
Image stabilization, camera movements, zoom effects, and transitions.
I introduce zoom effects where I want to zoom into a part of the original scene.
I also add camera movement effects that simulate a true camera movement.
If required, I apply image stabilization to reduce camera shakes.
Here I also adjust some of the transition effects from the basic cut.
Localized corrections:
Imagine that we want to light up only the face of a person or to add some “skin softness”.
As this person moves around on the screen from one frame to the next, we need to adjust where the corrections need to be applied on every frame.
It required some “masking” and “tracking” to apply the corrections only on the areas we need. There are many ways to create masks and many options to adjust tracking paths.
See the following screen:
Applying adjustments using nodes:
I apply the corrections using nodes (small thumbnails on the right).
They work similarly to layers where each node is applied in sequence.
You can copy and move them around, change the sequence, divide channels of colour, and many more sophisticated adjustments.
On this screen, you can see that I have a mask on Elga’s face to apply some adjustments only to her skin.
One very common use of masks is to create vignettes. Vignettes are very effective in leading the viewer’s eyes to important parts of the scene.
The artistic look and versions
The artistic look of the video is one of the last phases of video post-processing.
Before I start with any creative changes, I save the project with all the basic adjustments.
The version controls inside Resolve 12 are very good for this.
I reset the timeline to the “clean” version many times before I made up my mind on which look is best for each video.
The Version control is a great way to present options for the client and to be able to switch from one version to the other without too much work.
For this video, I decided to keep it as real as possible to pass on the message that Elga is a true, honest, and real person with a crisp and polished technique and repertoire.
The video was not to create any particular emotional reaction and I did not want to add anything that would distract the viewer from her technique.
Titles, logos, and final reviews:
The very last steps are to introduce titles, logos and to watch the whole video one time.
In other projects, we may need to add a voice-over audio, background music, rolling titles, special effects, slides/stills, and many other enhancements.
When I am happy with the video, I export a version to the client for approval. I add a timer on the screen to assist them in marking the place they need changes.
Render the final video:
This is where we can render the video to multiple media servers (YouTube, Vimeo, etc). Here I adjust the resolution and compression mode based on where the video will be played.
Conclusion:
Now you know the number of tasks that are required in simple video production to make them look and sound their best. It is quite normal to spend many days editing a 3-minute video.
The best way to keep every video project on schedule and “on budget” is to plan it well and have good execution of the plan.
A good editor and colorist can process a video quite fast when they know what is to be done, the sequence of scenes, and the story. They will take much longer if they need to “come up with something” from a sequence of video files.
We offer all our customers an initial free-of-charge 1-hour meeting. It allows us to understand the idea and come up with a plan and estimated cost.
Write your comments on this page and share them.
Thank you.
Top pages
Commercial Photography
Photos on your business - Show what you do
Product Photography
Advertising photos of all products
Portfolio
Photos we are proud of for your reference
Latest jobs and articles
Read articles about some of our jobs
Corporate Headshot
Ideal for LinkedIn, FB, Social media and CV
Creative portraits - Models and actors
Update your portfolio and get more work
Find out more about our services
Video Services
Video of your products, business, training and more


