We tested the PA148CTV as a small portable monitor for photography and video
Can this small monitor substitute a larger one outside the studio?
I received the ASUS ProArt PA148CTV screen from ASUS Australia to use and test for a couple of weeks and give my opinion regarding the product and its use in a commercial advertising photography studio.
If you are not interested in all details, you can jump and read my conclusions at the end of the article.
I identified 3 areas where the monitor could be very useful for my work.
- As an extra screen close to the camera and product when tethering in Capture One.
- As the main screen on a location also tethers with Capture One (or Lightroom)
- As a video monitor when filming.
To read all the technical specs of the monitor, search or copy/paste:
“https://www.asus.com/displays-desktops/monitors/proart/proart-display-pa148ctv/”
Let’s go to each of the specific uses:
1 – An extra screen close to the camera and product when tethering in Capture One or Lightroom.
There are many advantages of photographing with the camera directly connected to a computer (Tethering) and the most important is to be able to inspect well the composition, exposure, color and focus.
This is my current studio setting:

I use this large screen attached to a small computer, a small wireless keyboard, and a mouse. This stand has wheels and I can move it around the studio when shooting but it is heavy and not really mobile.
My workflow goes like this: Place the product on the table, adjust the camera and lights, and shoot. Walk back to inspect the results on the large screen. Walk back adjust, shoot, and back to the screen. Walk back and forth until it is perfect.
With the ASUS as a second screen, the time and walking have reduced. This is what it looks like as a second screen closer to the product.

As you can see, both screens are connected to the same computer as an extended desktop. In this test, I was using a short HDMI video cable and the product is close to the main screen. You can have a long HDMI cable for extra flexibility.
What I love about the screen:
Good resolution, sharp, good color but the best is IT IS TOUCH SCREEN!
Seriously, it is fantastic to be able to do what you need directly on the screen.

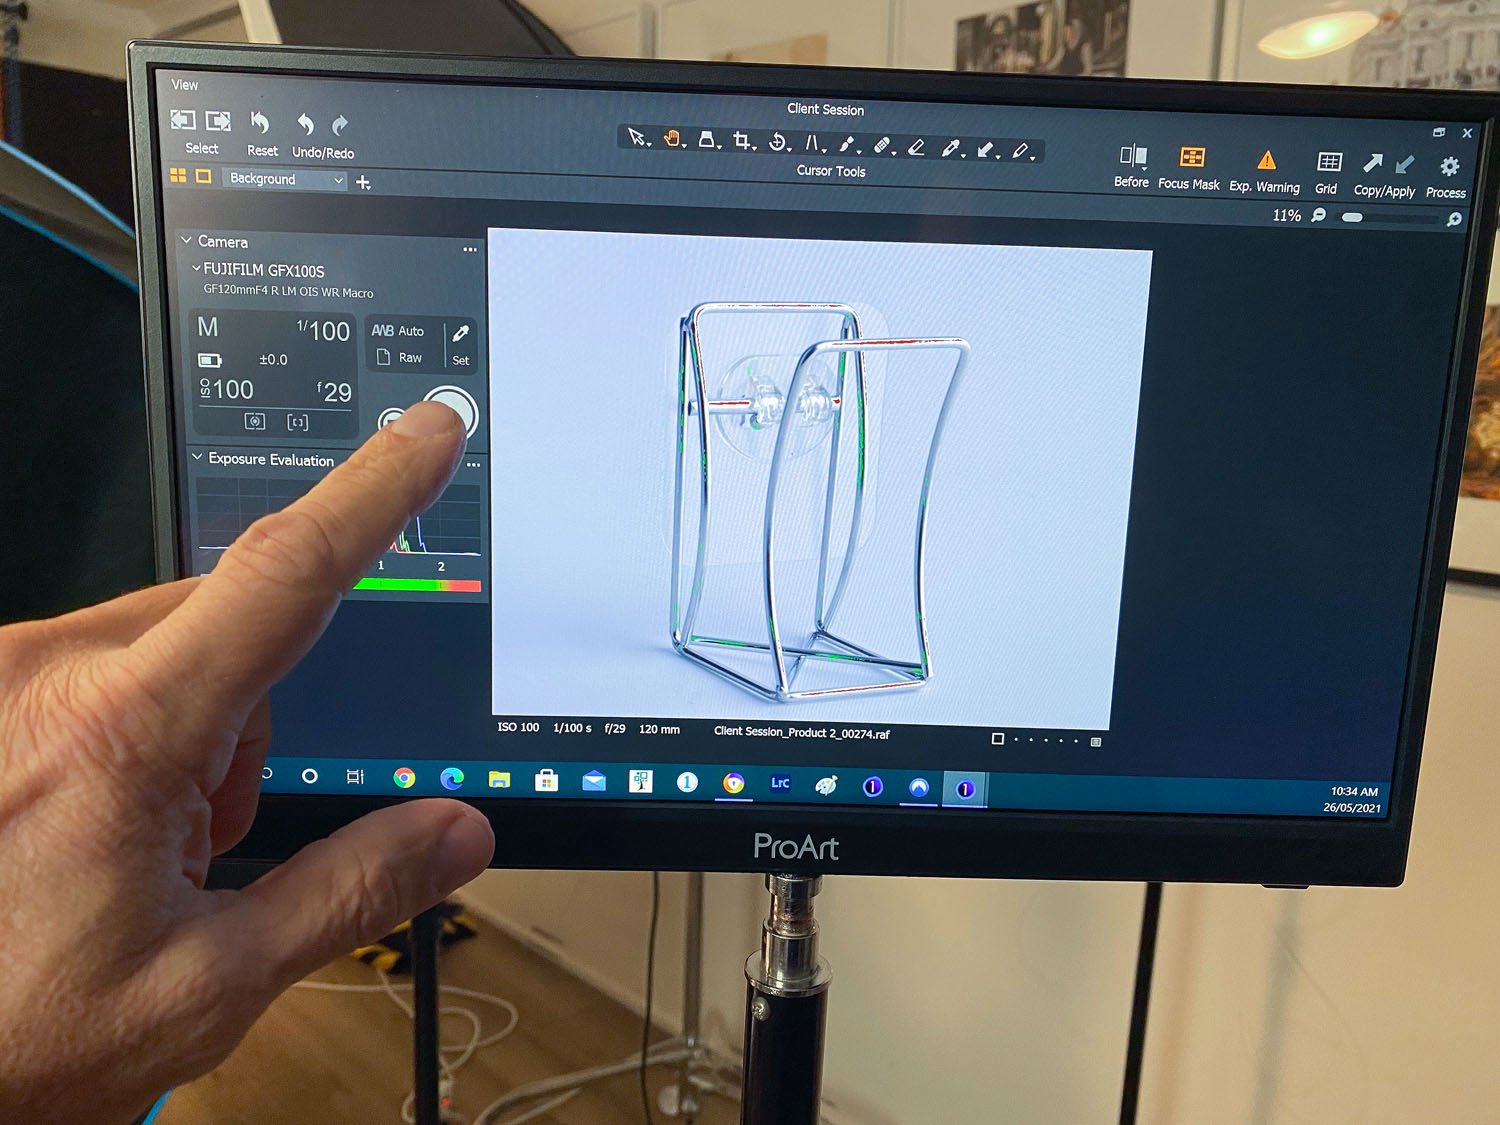
Zoom in and inspect focus and exposure. In this picture, I have the focus mask (green marks) and exposure warning (red marks).
And you can change the camera settings and fire directly on the screen.
This next image shows the small PC with the Tethered cable (orange) connected, the monitor on a standard light stand,s and the PC in a clamp attached to the same light stand. Note that the screen is non-reflective and very comfortable to use.

Extended desktop, touch-screen settings, and how it all works
It took me a few hours of testing and researching to find out how to get the two screens to work well together.
The two screens have different native resolutions, the larger Benq is a 4K screen and ASUS is Full HD. I did not want to reduce the resolution of the large screen, so the solution was to extend the desktop to both monitors.

The monitor started showing the extended desktop on the correct resolution but for the touch screen to work, we need to tell Windows which screen has the touching capability.
This is done by adjusting the “tablet PC Settings” and clicking Setup.

It will show the following message on each screen, one at a time. You press “enter” or touch the screen to select the one with the touching capabilities.

USB C Cable – Video and Touching functionality
The monitor sends the touchscreen information to the PC via a USB cable. The video signal goes normally with the HDMI but with my PC, it all goes with the USB-C. So, only one cable can supply the video signal as well as the mouse movement signal.
This small PC I am using inside the studio is an Intel NUC, formally called “Skull Canyon”. It is very good and fast.
Preparing Capture One for a second monitor.
Capture One has a “Dual Screen” mode but I found it not to be a good solution here. It spreads the panels over two screens and this is not what I need. I want the main large monitor to show all the normal Capture One tools and panels while the second smaller screen to have only some of the tools.
I need a viewer where I can zoom in on the image and inspect it well, a panel with a histogram and a panel with the camera adjustments.
This is how I did on Capture One. First, I created a new Viewer (Windows + Viewer) or F10.

I moved the new viewer to the ASUS monitor. You can create as many floating tools as you need and move them to the ASUS monitor.

Of all tools that you may float and have on the extra monitor, I selected the Camera and the Exposure Evaluation tools. They are the two most important to me.
The following image shows how I am using the monitor. Note that the viewer has only two tools and was customized with the Focus Mark and Expo Warning.

Canon and Fujifilm Cameras X Capture One and Lightroom
I have used Canon cameras (5Ds) and Lightroom for many years and most recently I have started using the Fujifilm GFX 100s and Capture One Pro.
I can talk about the advantages and differences between cameras and these two great products when capturing images but not in this article. Here I just want to say a few things that are relevant while using the monitor as a second screen.
Capture One and Lightroom normally work a lot better with Canon cameras while tethering. The Live View of Capture One using a Canon camera is close to “perfect”. Responsive, full of options, and a great pleasure to use. The Live View (CO and Lightroom) for the Fujifilm GFX100s does not work that well. You cannot fire or adjust the camera while on Live View.
I am not saying that it is all perfect with a Canon and not good with Fujifilm. There are things that Capture One communicates better with a Canon camera but there are others that Fujifilm does just as well or better.
This is just to say that if you use a Canon camera (I do not know anything about Nikon or other brands), you may have Live View on the ASUS screen instead of the viewer as I have.
2 – As the main screen on a location also tethering with Capture One (or Lightroom)
There are times when we have to move out of the studio to a location but do not want to stop tethering and limit our capacity to judge the results on a large screen.
I have used wireless SD card transmitters, CamRanger wireless, laptops and even carried tables, monitors, and computers to warehouses, hotels, restaurants, and factories. All these options have their advantages and work well but this touch screen creates a very nice, small, light and reliable solution.
The studio computer is very small and light. It is currently attached to the light stand using a clamp with a flexible arm. If you want to have something more permanent, I suggest double-stick tape and placing the computer on the back of the monitor.
It is very easy and fast to move from the studio to a location. All I need to do is to remove the tethering cable from the PC and the HDMI cable from the large screen. It makes for a super-light, fully portable set to take anywhere that has electricity. No need to transfer files in any way. It is just like if you were working in the studio.
When you are back in the studio, there is no need to transfer anything. It is all on the same computer.
Have a look at these photos where I was photographing using only the ASUS screen.

Note the PC with the flexible arm and clamp. A “flexible” solution but works.

PC connected to the camera and the monitor.

It shows the main screen of Capture One on the ASUS monitor with all your tools in the right place.
In this configuration, I can still have the Capture One “Capture Pilot” server running and the client can see what I am photographing on an iPad/Web/Phone. It does not require any other WiFi software.
I think this solution is better than a notebook because of its price, performance, flexibility, and ease of use. You would need quite a good notebook to have the same processing power, hard disk, and memory as this small PC. It is easier to move around, it is well secured on the light stand, and there is no need for a keyboard, mouse/mousepad, or a table/support for the notebook. You can fit it in a very small place and it is light and powerful. The only disadvantage is that this configuration does not run on batteries.
3 – As a video monitor when filming.
It is not a surprise that the ASUS PA148CTV works very well as a video monitor.
My Fujifilm GFX 100s camera has a micro-HDMI video out and the ASUS PA148CTV also uses this as a video-in port. I used a relatively long (close to 2 meters) cable. In fact, for this camera, I used two cables. One is a micro-HDMI to a Female HDMI small cable and the other was a micro-HDMI and a full-size HDMI longer cable. Sometimes we need to place the camera in hard-to-reach places and having a long cable helps.
There are many small video recorders such as the Atomos range that are great. They are an almost required tool for many video producers. This ASUS screen can be used as a larger monitor attached to a recorder or directly connected to the HDMI output of the camera when the main recording is taking place inside the camera. In both cases, its color quality and precision are very important.

With the Fujifilm GFX100s, you can select the film simulation or the Log type you want to have on the memory card and on the HDMI output port.
You can have the HDMI port set to output the video with a Velvia film simulation or any of the 10+ other looks while on the card you record on a low saturation and low contrast (better for color grading) log-based file.

It can also be used to compare each film simulation mode and decide which one is better for a scene. The ASUS screen is of very high image quality, sharp, excellent color sRGB reproduction, and calibrated. A good monitor is very important when filming.
Conclusions
ASUS PA148CTV is light, has good resolution, mat finish (low reflection), great color rendering, is well built, and easy to use and adjust. It has a nice support flap on the back for desktop use with plenty of working angles. It comes with a nice padded pouch for transportation as well. All of these are great but for me, what makes it very special is that you can mount it on a light stand or tripod and it is a touch screen.
It can be used as the main screen on light and portable capturing computers for tethering shooting or as a second screen closer to the shooting area. The touch screen allows you to inspect the images well, and adjust the camera and all controls fast and easily.
It is also a very nice screen to monitor your video production.
I did not know I needed one but now I want one.
Visit our commercial photography and product photography services pages or contact us for a chat.
Please send me your comments and questions. Thank you.
Top pages
Commercial Photography
Photos on your business - Show what you do
Product Photography
Advertising photos of all products
Video Services
Video of your products, business, training and more
Portfolio
Photos we are proud of for your reference
Latest jobs and articles
Read articles about some of our jobs
Find out more about our services
Photography Services
See all our photography services
Other related articles